Miss Maggie has asked me for a tutorial on how I choose to color eyes, so here it is in roughly five steps. In this tutorial, I'm going strictly from
 to
to  .
.
(It was bugging me, so I hastily colored it.)
Some of the pictures were cut off, so feel free to click on the links in the second post to see them in my Photobucket account.
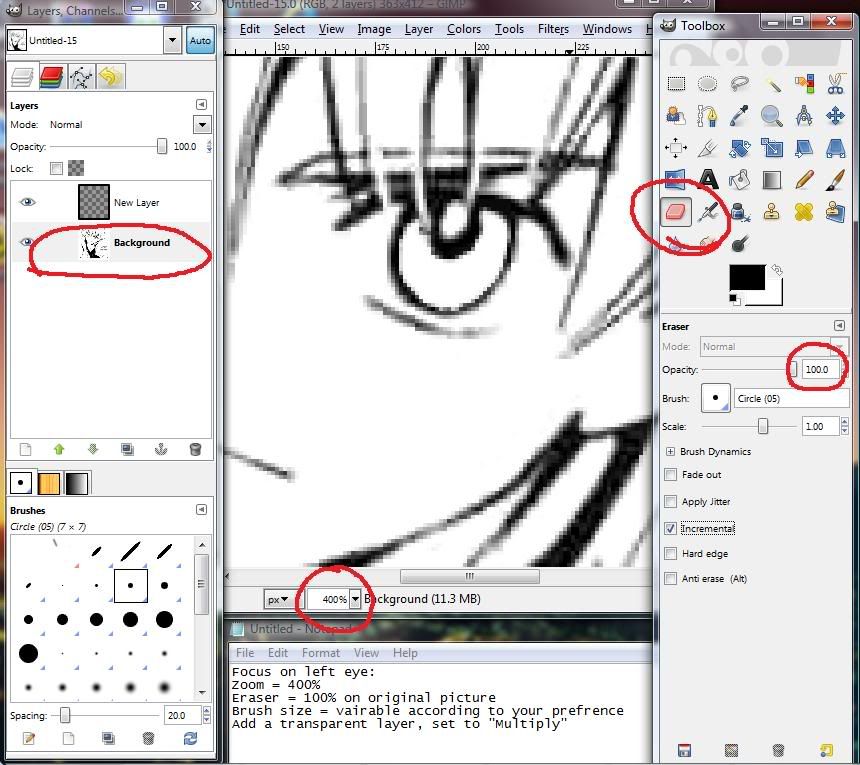
Step One: Empty out the black eye. Simple enough, right?
-Set the zoom on your window to 400%.
-Grab the eraser tool (or the paintbrush set to white).
-Here's the only tricky part of the step: take out as much as you can, leaving in a black outline of the eye itself and some representation of the pupil. It does not have to be perfect, as shading will fix any mistakes you may have.
-In this step, I went ahead and added a "Multiply" layer to the image.
Picture of this step:
Step Two: Solid color.
-Color in the now white part of the eye on your new Multiply layer. Pay no attention to my color suggestion, as I randomly choose my colors (though I really shouldn't) and end up with something different every time.
-DO NOT COLOR IN THE MAIN HIGHLIGHT OF THE EYE!
Picture of this step:
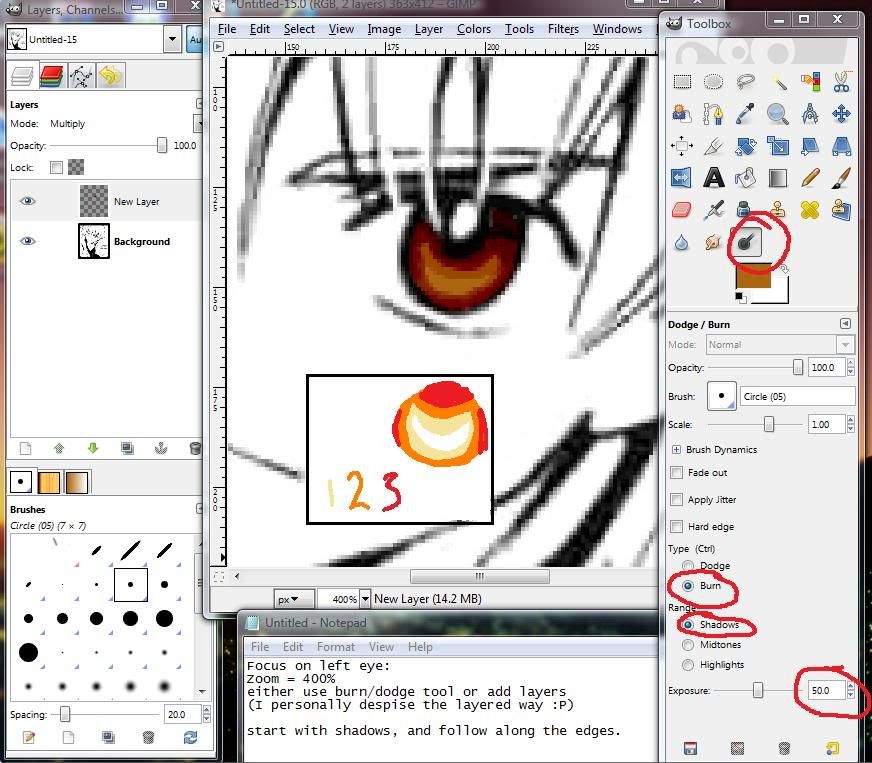
Step Three: Add shadows to the eye.
-When shading this way, I find it easier to think of an outline of a semi-circle. I use GIMP's burn tool set on "Shadows", as that way is much easier and more familiar for me.
-For this step, I would highly suggest looking at the picture below.
-Leave a smile in the middle unshaded, and grow darker as you get closer to the edges.
-The darkest, at the top of the eye, should be as close to black as you can get. That's how you'll know that it's dark enough.
-IN THIS STEP, LIGHTER COLORS NEED A HIGHER EXPOSURE; DARKER COLORS NEED A LOWER EXPOSURE.
Picture of this step:
Step Four: Add a lesser highlight to the eye.
-Using GIMP's dodge tool set to "Midtones", lighten the smile in the eye you left mostly untouched with shadows. It's perfectly fine if these strokes overlap your shadows from the previous step (it actually looks better that way sometimes).
-The lightest smile of the eye should be as close to white as you can make it.
-IN THIS STEP, LIGHTER COLORS NEED LOWER EXPOSURE; DARKER COLORS NEED A HIGHER EXPOSURE.
Picture of this step:
Step Five: Tweak to your liking, meaning blend if you need to using a blur tool.
Picture:
And that's all! Feel free to comment with your own creations, questions and comments!
 to
to  .
.(It was bugging me, so I hastily colored it.)

Some of the pictures were cut off, so feel free to click on the links in the second post to see them in my Photobucket account.
Step One: Empty out the black eye. Simple enough, right?
-Set the zoom on your window to 400%.
-Grab the eraser tool (or the paintbrush set to white).
-Here's the only tricky part of the step: take out as much as you can, leaving in a black outline of the eye itself and some representation of the pupil. It does not have to be perfect, as shading will fix any mistakes you may have.
-In this step, I went ahead and added a "Multiply" layer to the image.
Picture of this step:
- Spoiler:

Step Two: Solid color.
-Color in the now white part of the eye on your new Multiply layer. Pay no attention to my color suggestion, as I randomly choose my colors (though I really shouldn't) and end up with something different every time.
-DO NOT COLOR IN THE MAIN HIGHLIGHT OF THE EYE!
Picture of this step:
- Spoiler:

Step Three: Add shadows to the eye.
-When shading this way, I find it easier to think of an outline of a semi-circle. I use GIMP's burn tool set on "Shadows", as that way is much easier and more familiar for me.
-For this step, I would highly suggest looking at the picture below.
-Leave a smile in the middle unshaded, and grow darker as you get closer to the edges.
-The darkest, at the top of the eye, should be as close to black as you can get. That's how you'll know that it's dark enough.
-IN THIS STEP, LIGHTER COLORS NEED A HIGHER EXPOSURE; DARKER COLORS NEED A LOWER EXPOSURE.
Picture of this step:
- Spoiler:

Step Four: Add a lesser highlight to the eye.
-Using GIMP's dodge tool set to "Midtones", lighten the smile in the eye you left mostly untouched with shadows. It's perfectly fine if these strokes overlap your shadows from the previous step (it actually looks better that way sometimes).
-The lightest smile of the eye should be as close to white as you can make it.
-IN THIS STEP, LIGHTER COLORS NEED LOWER EXPOSURE; DARKER COLORS NEED A HIGHER EXPOSURE.
Picture of this step:
- Spoiler:

Step Five: Tweak to your liking, meaning blend if you need to using a blur tool.
Picture:
- Spoiler:

And that's all! Feel free to comment with your own creations, questions and comments!

Last edited by StrugglingAlibi on Mon 10 Nov 2008, 08:13; edited 2 times in total


 Yeah~~ You did the tutorial!!!! Though I suppose you are the "expert" for coloring blue eye over brown eye
  [*cough* for obvious reason ;P] but nevertheless it is just a matter of picking the right color!!
  THANKS SO MUCH!!

 that make sense~~ I was confused by your little picture of "1, 2, 3"... I thought it is the "other way around".... in which the first stroke is that little window area around the smile... and 2nd stroke widen it more... and 3rd stroke is the whole eye [you know with the outer edge thingy]

 These tutorial on eye colouring are really helpful! Thank you so much for posting these!


» Kingdom of orphans
» Vanapia Hanto: Kawari Unmei
» The Prince Detective
» xxxholic chapter 182
» One million pages thread!!
» Rate that Character
» Give the person above you a nickname
» Watcha doing?
» Banned game!
» Horitsuba Gakuen
» Science and Life